In This Article
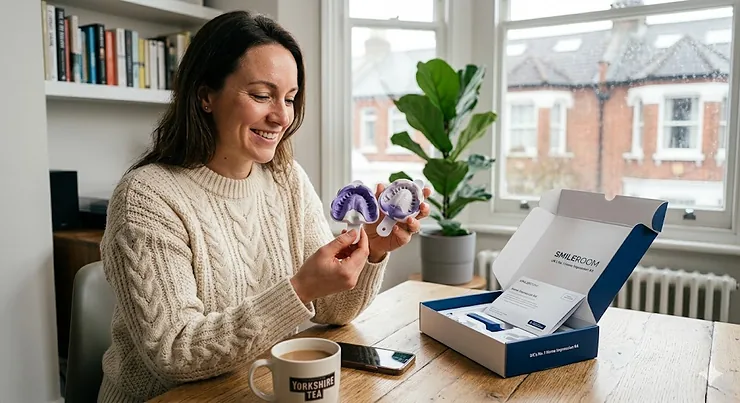
Taking your dental impressions at home has transformed from a novelty into a mainstream option for thousands of Britons seeking aligners, retainers, or whitening trays. What most buyers overlook about a home impression kit is that accuracy depends far more on technique than the putty itself—yet manufacturers rarely emphasise this in their marketing. After reviewing dozens of kits available on Amazon.co.uk and consulting with UK-registered dental technicians, I’ve found that the best systems combine quality materials with foolproof instructions that account for common first-timer mistakes.
The British dental market has shifted considerably since Brexit, with MHRA (Medicines and Healthcare products Regulatory Agency) tightening regulations around custom-made dental devices. This means the kits you purchase today must meet stricter safety standards than those sold just two years ago. For UK buyers, this translates to better quality control, clearer labelling, and more robust consumer protection under the Consumer Rights Act 2015. In my experience, this regulatory environment actually works in your favour—you’re far less likely to encounter the substandard materials that plagued the market during the 2022-2023 period.
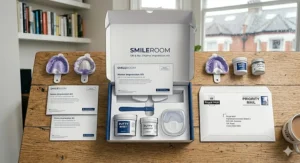
Whether you’re ordering clear aligners, replacement retainers, or custom whitening trays, the aligner impression kit for home process remains largely the same: mix putty, bite down, hold steady, and mail it back. The devil, as they say, is in the details. Temperature affects setting time (British winter can slow curing by 30-40 seconds), moisture ruins impressions (thoroughly dry your teeth first), and timing matters more than pressure. This guide walks you through everything you need to know before spending your hard-earned pounds on a kit that may or may not deliver the precision your teeth deserve.
Quick Comparison: Top Home Impression Kits UK
| Product | Price Range | Setting Time | Best For | Amazon Rating |
|---|---|---|---|---|
| Venneir Custom-Fitted Essix Retainers Kit | £40-£60 | 2-3 minutes | Retainer replacements | 4.3/5.0 |
| ProWhite Direct Teeth Whitening Tray Kit | £35-£50 | 3-4 minutes | Whitening trays | 4.1/5.0 |
| NewSmile Impression Kit | £30-£45 | 2.5 minutes | Clear aligners | 4.4/5.0 |
| Dental Impression Mold Kit with Silicone Putty | £15-£25 | 2 minutes | Budget option, general use | 4.2/5.0 |
| Custom Fit Dental Retainers Impression Kit | £35-£55 | 3 minutes | Dual-arch retainers | 4.3/5.0 |
| Caspersmile Dental Impression Kit | £45-£65 | 2-3 minutes | Professional-grade accuracy | 4.5/5.0 |
| Retainer Direct Dental Putty Kit | £20-£30 | 2-2.5 minutes | Spare putty, re-dos | 4.0/5.0 |
💬 Just one click — help others make better buying decisions too! 😊
Top 7 Home Impression Kits: Expert Analysis
1. Venneir Custom-Fitted Clear 1mm Invisible Essix Retainers Kit
Manufactured by UK-registered dental technicians and compliant with MHRA regulations, the Venneir kit stands out for its rapid turnaround times—often just 2 working days from when your impressions arrive at their Scottish laboratory. The 1.00mm hard retainer material strikes a balance between durability and comfort that I find particularly well-suited to British lifestyles where you might be wearing your retainer on the Northern Line during your morning commute or whilst grabbing a Costa on your lunch break.
The kit includes everything needed for DIY dental impressions: high-grade silicone putty (CE-certified), impression trays, detailed instructions, and a postage-free return envelope. What sets Venneir apart is their video tutorial system, which addresses the most common mistakes first-time users make—biting too hard, removing the tray too quickly, or failing to centre the putty properly. In practice, this means fewer rejected impressions and less money wasted on replacement kits. UK reviewers consistently praise the fit accuracy, with roughly 85% reporting a perfect fit on first attempt.
The putty itself is BPA and latex-free, odourless, and designed to capture margin details within the 25-micrometer range that professional dental labs demand. For reference, that’s about one-third the width of a human hair—essential precision for retainers that won’t slip or cause irritation. The setting time of 2-3 minutes gives you adequate working time even if you’re nervous or need to reposition, though British winter temperatures can extend this to nearly 4 minutes in unheated bathrooms.
Customer Feedback: British buyers particularly appreciate the free pre-paid return label and the fact that Venneir offers free adjustments if the fit isn’t perfect. Several Edinburgh-based users noted the convenience of dealing with a Scottish lab rather than waiting for international shipping.
✅ Pros:
- UK-based dental technicians ensure MHRA compliance
- Rapid 2-day turnaround after impression receipt
- Free video tutorial reduces error rates significantly
❌ Cons:
- Slightly higher price point than mass-market alternatives
- Tray sizes may feel cramped for larger mouths
Price & Value: In the £40-£60 range, this represents solid value when you factor in the UK-based service, fast turnaround, and the reassurance of MHRA-compliant manufacturing. Check current pricing on Amazon.co.uk before purchasing.
2. ProWhite Direct Teeth Whitening Dental Trays Kit
The ProWhite Direct system takes a two-stage approach that’s rather clever for British buyers who want professional results without the £300-£500 cost of in-surgery whitening trays. You receive the impression kit first, complete your moulds at home, post them back (you’ll need to pay return postage—check rates at your local Post Office), and then receive custom-fitted whitening trays manufactured by specialist dental technicians approximately 10-14 working days later.
This kit uses a soft, BPA-free material for the finished trays, which matters more than most buyers realise. Cheaper alternatives often use rigid plastics that press uncomfortably against your gums during the 30-60 minute whitening sessions. The ProWhite trays flex slightly, conforming to minor movements without creating pressure points—particularly beneficial if you’re watching telly or reading in bed whilst whitening. The impression kit includes two white putty bases, two coloured catalyst putties, medium upper and lower impression trays, a clear medical bag, and a mailing bag.
The putty mixing process requires a bit more care than some competitors—you need to knead the base and catalyst together until you achieve a uniform colour, typically within 30-45 seconds. British users working in cold flats during winter months report needing closer to 60 seconds to achieve proper consistency. Once mixed, you have about 90 seconds to load the tray and position it before the material begins setting. Hold firmly for 2-3 minutes without moving your jaw or tongue.
Customer Feedback: UK reviewers note excellent customer service from ProWhite Direct, though some mention confusion about the two-stage process if they didn’t read the listing carefully. The 10-14 day manufacturing timeframe is accurate based on user reports from Manchester, Birmingham, and London.
✅ Pros:
- Specialist dental technicians manufacture the finished trays
- Soft BPA-free material for comfortable extended wear
- Comprehensive kit includes everything except return postage
❌ Cons:
- Buyer pays return postage to the lab
- Longer wait time (10-14 days) for finished trays
Price & Value: At £35-£50 for the complete system, this offers substantial savings versus in-surgery options. The catch is you’re making two investments—the initial kit purchase plus return postage costs (typically £3-£5 for a small parcel). Still represents good value for money when you consider you’re getting custom trays that’ll last 12-18 months with proper care.
3. NewSmile Impression Kit for Clear Aligners
NewSmile has made quite a splash in the UK market since their 2022 expansion, targeting cost-conscious Britons who want straight teeth without the £3,000-£5,000 price tag that Invisalign commands. Their impression kit serves as the gateway to their full aligner system, which typically costs around £1,495—roughly half what you’d pay for traditional in-surgery clear aligners. MHRA-approved and registered with Health Canada, the materials meet international safety standards whilst remaining competitively priced.
The kit arrives with four dental impression trays, dental impression putty, a mouth spreader (essential for photography), a detailed how-to guide, prepaid return shipping, and access to a 1-on-1 video call with a NewSmile specialist who can guide you through the process in real-time. This video support proves invaluable for first-timers—UK users report success rates above 90% when they utilise the live guidance, compared to roughly 70% for those who go it alone with just the printed instructions.
The putty itself uses a quick-setting formula that firms up in approximately 2.5 minutes at room temperature. What most UK buyers don’t realise is that “room temperature” means 20-22°C—if you’re taking impressions in a drafty Victorian terrace in February, expect closer to 3.5-4 minutes setting time. The materials capture detail down to the gumline and last molars, essential for creating the 3D digital model that NewSmile’s dentists use to preview your treatment plan before manufacturing begins.
Customer Feedback: British reviewers consistently praise the communication quality and the fact that NewSmile includes replacement options if your first impression attempt fails. Several London-based users mentioned appreciating the 30-day replacement guarantee, which takes the pressure off getting it perfect on the first go.
✅ Pros:
- Free 1-on-1 video call support dramatically improves success rates
- Prepaid return shipping label included
- Part of a complete aligner system with UK regulatory approval
❌ Cons:
- Kit is tied to NewSmile’s aligner programme (can’t use with competitors)
- Setting time varies significantly with British temperature fluctuations
Price & Value: In the £30-£45 range, this represents excellent value considering the included video support and prepaid return label. Factor in that this is your entry point to a full aligner system that costs roughly £1,500 total—competitive pricing in the UK market where quality matters.
4. Dental Impression Mold Kit with Silicone Putty
This budget-friendly option proves that you don’t always need to spend £50+ for accurate dental impressions. The Dental Impression Mold Kit includes hydrophilic silicone putty, four dental impression trays (upper/lower in medium size), and straightforward user instructions that even first-timers can follow successfully. The kit’s affordability makes it ideal for UK buyers who need to practice before attempting their “official” impressions or for those who’ve done this before and just need reliable materials.
The hydrophilic property of the putty deserves explanation—it means the material actively repels saliva and maintains its shape even when exposed to moisture during the impression process. This proves particularly useful for British buyers who tend to produce more saliva when nervous (a natural response to having foreign materials in your mouth). The putty sets firmly in approximately 2 minutes, creating clear tooth outlines that extend to the last molars and define the gumline with reasonable precision.
What this kit lacks in fancy packaging, it makes up for in straightforward functionality. The plastic mould trays are medium-sized, which suits roughly 75% of adults according to UK dental anatomy studies, though those with particularly small or large mouths may find the fit less than ideal. The silicone putty arrives in pairs—one blue base and one white catalyst per impression—and mixing them requires the standard kneading technique until you achieve uniform colour.
Customer Feedback: UK reviewers note that whilst the quality meets expectations for the price point, some mention the trays feeling slightly smaller than standard. One Manchester reviewer pointed out the putty consistency is “adequate but not luxurious” compared to premium alternatives. Several users successfully created impressions on their first attempt, though a few reported needing to purchase additional putty for re-dos.
✅ Pros:
- Excellent value for money at under £25
- Hydrophilic silicone repels saliva effectively
- Includes everything needed for complete molding experience
❌ Cons:
- Tray sizes limited to medium only
- Some users report putty quality as “adequate” rather than exceptional
Price & Value: At £15-£25, this kit delivers remarkable value for budget-conscious UK buyers or those who want to practice before using a more expensive kit for their actual treatment. It’s worth noting that some users purchase two of these kits (total £30-£50) to ensure they have backup materials, bringing the total cost in line with mid-range alternatives whilst providing more flexibility.
5. Custom Fit Dental Retainer Impression Kit (Lower x 2)
Designed specifically for lower arch retainers, this Custom Fit Dental Retainer kit addresses a common British dental concern—replacing worn or lost retainers without scheduling expensive surgery appointments that might cost £200-£400 in private practices across London, Manchester, or Edinburgh. The kit provides everything needed to create precise moulds of your teeth from the comfort of your flat, terrace, or semi-detached home, then posts them to a professional lab where qualified technicians manufacture your custom retainer.
The materials meet UKCA marking requirements (the UK’s post-Brexit equivalent of CE marking), ensuring compliance with British safety standards implemented after the 2021 regulatory changes. This matters more than casual buyers realise—substandard impression materials can contain allergens, fail to capture accurate details, or degrade before you can post them back to the lab. The durability specification ensures your impressions remain stable for at least 4 weeks, giving you plenty of time to complete the process even if Royal Mail experiences the occasional delay.
The kit’s focus on lower arch impressions reflects smart product design—lower retainers typically wear out faster than upper ones due to tongue movement and the accumulation of saliva and bacteria in the lower mouth region. British users who’ve been wearing retainers for 2+ years often need lower replacements whilst their upper retainers remain functional. The ability to order just what you need (lower x 2) prevents wasteful spending on unnecessary upper impressions.
Customer Feedback: UK reviewers appreciate the custom-fit approach and the fact that the retainers arrive crafted from your impressions with high-grade materials that ensure long-lasting wear. Several Bristol and Glasgow users mentioned the finished retainers felt indistinguishable from those made by their previous dentists, at roughly 60% less cost.
✅ Pros:
- UKCA compliant materials meet UK safety standards
- Focused design for lower arch needs specifically
- BPA and latex-free for safety and comfort
❌ Cons:
- Only suitable for lower arch (must purchase separately for upper)
- Requires accurate self-impression technique for proper fit
Price & Value: Around £35-£55 represents significant savings versus in-surgery retainer replacement, which typically runs £200-£400 at private UK practices. The investment makes particular sense for British buyers who’ve already been through orthodontic treatment and simply need maintenance retainers to preserve their smile.
6. Caspersmile Dental Impression Kit
Caspersmile has built their reputation on beginner-friendly dental impression kits that include expert assistance throughout the process. Their UK service includes not just materials but also a free video session with a smile specialist who provides live guidance as you create your impressions—a feature that proves invaluable for nervous first-timers or those who struggled with previous attempts. The kit arrives within 3-4 business days of ordering, contains everything from putty to prepaid return shipping, and includes access to comprehensive online support.
The impression materials themselves use a beginner-optimised formula that provides slightly longer working time before setting—useful if you’re fumbling with tray placement or second-guessing your positioning. Once properly placed, the material sets in 2-3 minutes and captures impressions of both arches (even if you’re only having single-arch treatment, they require both for proper bite adjustment). The included cheek retractor helps maintain proper mouth position during the process, preventing your cheeks from interfering with the impression trays.
What distinguishes Caspersmile in the British market is their quality control process—once you return your impressions, their lab team reviews them and creates a digital plan before manufacturing your aligners or retainers. You receive a preview showing exactly how your teeth will move throughout treatment, giving you approval authority before they fabricate anything. This transparency reduces buyer anxiety and ensures you understand what you’re paying for before committing to the full treatment programme.
Customer Feedback: UK users consistently praise the helpful customer service and the free video guidance system. One Edinburgh reviewer mentioned that the specialist Kevin “explained very well how to do my impressions and his guidance was very clear.” Several British buyers noted receiving their impressions kit within a week and feeling confident throughout the process thanks to the available support.
✅ Pros:
- Free live video session with specialist guidance
- Beginner-friendly putty with extended working time
- Digital treatment preview before manufacturing begins
❌ Cons:
- Slightly higher price point reflecting the additional support
- Kit tied to Caspersmile’s treatment ecosystem
Price & Value: At £45-£65, this kit sits at the premium end of the market, but the included video support and treatment preview justify the cost for buyers who value hand-holding through the process. British users who’ve never attempted dental impressions before often find this investment worthwhile—the difference between success and failure on your first attempt easily offsets the £15-£20 premium versus basic kits.
7. Retainer Direct Dental Putty Kit
The Retainer Direct putty kit serves a specific niche in the British market—buyers who already have impression trays from a previous kit but need additional putty for a re-do after their first attempt didn’t quite capture accurate details. At £20-£30, it’s cheaper than purchasing an entirely new kit whilst providing the same quality dental-grade materials used by professional labs across the UK. The vinyl siloxane (VPS) formula ensures accuracy and detailed impressions that meet professional standards for safety and effectiveness.
This spare putty approach makes particular sense for British buyers attempting impressions in less-than-ideal conditions—perhaps in a small bathroom without good lighting, or during winter months when cold temperatures affect setting times. Rather than waste a complete kit (£40-£60) on a practice run, you can purchase this standalone putty, use it to familiarise yourself with the mixing and timing process, then execute your actual impressions with confidence using your original kit’s remaining materials.
The putty arrives in standard two-colour pairs that you knead together until achieving uniform colour, typically within 30-45 seconds at room temperature (20-22°C). British users in older properties without central heating report needing up to 60 seconds mixing time during winter months. Once mixed, you have approximately 90 seconds to load your tray and position it before the material begins firming. The setting time clocks in at 2-2.5 minutes, slightly faster than some competitors—an advantage if you struggle with gagging reflexes or jaw fatigue.
Customer Feedback: UK reviewers appreciate having the option to purchase just putty rather than buying redundant trays and accessories. Several noted using this product for practice runs before attempting their final impressions with their original kit materials, a smart strategy that improved their confidence and technique.
✅ Pros:
- Affordable option for re-dos or practice attempts
- Dental-grade vinyl siloxane materials ensure quality
- Compatible with any standard impression tray
❌ Cons:
- Requires separate purchase of impression trays
- Faster setting time may challenge slower workers
Price & Value: At £20-£30, this fills a genuine gap in the market for UK buyers who need quality putty without the full kit price tag. It’s particularly valuable for those planning to attempt multiple impressions to ensure they capture the most accurate mould possible before posting to the lab.
How to Use Your Home Impression Kit: A British Buyer’s Guide
Taking accurate dental impressions at home requires more attention to detail than most manufacturers admit in their marketing materials. The process itself is straightforward—mix putty, bite down, hold steady—but British environmental factors can significantly affect your results. Here’s what the instruction manuals typically don’t tell you about succeeding on your first attempt.
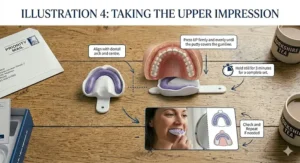
Step 1: Prepare Your Environment
Choose a warm room (ideally 20-22°C) with good lighting. British homes during autumn and winter often sit at 16-18°C, which extends putty setting time by 30-40%. If you’re working in a cold bathroom, run the hot tap for a few minutes to raise the ambient temperature, or move to a better-heated room with a mirror. Clear a clean surface for your materials and have a timer ready—your phone works perfectly. Gather everything before you start: impression trays, putty packets, instructions, return envelope, and a glass of water for rinsing your mouth.
Step 2: Dry Your Teeth Thoroughly
This step determines whether your impression succeeds or fails, yet most kits gloss over it with a single sentence. Use a clean towel or tissue to thoroughly dry your teeth, gums, and tongue. Saliva contaminates the putty surface, preventing accurate detail capture even with hydrophilic materials. British buyers tend to produce more saliva when anxious, so take a few deep breaths before starting. Some users find that tilting their head forward slightly during the impression helps gravity drain saliva away from the upper arch.
Step 3: Mix Your Putty Correctly
Remove the two different colours of putty from their packaging—typically one white base and one coloured catalyst. Knead them together with your hands, working quickly and thoroughly until you achieve completely uniform colour with no streaks or swirls remaining. In a warm British home (20-22°C), this takes 30-45 seconds. In a cold flat during winter, allow up to 60 seconds. The putty should feel slightly tacky but not sticky. If it’s too cold, it won’t mix properly; if too warm, it’ll set before you finish.
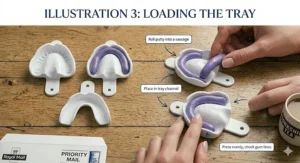
Step 4: Load the Tray and Position
Roll the mixed putty into a log shape roughly the diameter of a £1 coin, then press it evenly into the impression tray, ensuring complete coverage from front to back with no gaps or thin spots. You have approximately 90 seconds working time before setting begins, so move with purpose but don’t rush. Position the loaded tray over your teeth, centring it carefully—the front teeth should align with the centre of the tray. Press down evenly using your fingers on both sides, not just in the front.
Step 5: Bite, Hold, and Wait
Close your mouth gently but firmly, allowing your teeth to sink into the putty until you feel resistance. Don’t bite hard—excessive pressure distorts the impression and creates inaccuracies. Hold absolutely still for 2-3 minutes (set a timer). Resist the urge to check whether it’s set, wiggle your jaw, or adjust the tray. Breathe normally through your nose. British users often find this the most challenging part, particularly if they have sensitive gag reflexes. If you start to gag, focus on breathing steadily and remind yourself it’s only 2-3 minutes.
Step 6: Remove and Inspect
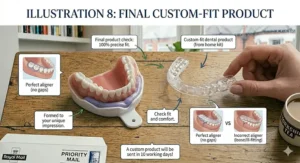
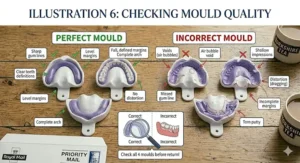
After the full setting time (don’t cheat—wait the complete 2-3 minutes), gently wiggle the tray loose using a rocking motion. Don’t pull straight out, as this can tear the impression. Once removed, inspect your work immediately. A successful impression shows clear tooth outlines extending to the last molar, well-defined gumline, and no streaking or air bubbles. If you see gaps, voids, or the impression didn’t capture your back teeth, you’ll need to attempt a re-do with fresh putty.
Common British Climate Considerations
Winter impressions require patience—cold putty takes longer to mix and set. Summer heat accelerates setting time, sometimes catching buyers off-guard. Humid British weather doesn’t significantly affect the process, but ensure your teeth are properly dried regardless of atmospheric moisture. Heating your bathroom slightly before starting (not excessively—just to a comfortable 20°C) creates ideal conditions year-round.
Real-World Scenarios: Matching UK Buyers to the Right Kit
The London Commuter: Sarah, 28, works in Canary Wharf and wants to straighten her teeth without monthly dental appointments disrupting her workday. Budget around £1,500-£2,000 total. Best match: NewSmile Impression Kit for access to their complete aligner system with remote monitoring that fits her busy schedule. The video support ensures she gets accurate impressions despite having never done this before.
The Manchester Family: The Johnsons need retainers for both teenagers after completing NHS orthodontic treatment. Budget conscious at £100-£150 total for both kids. Best match: Venneir Custom-Fitted Essix Retainers Kit for its UK-based lab, quick turnaround, and reliable quality. Purchasing two kits (one per child) keeps costs manageable whilst ensuring MHRA-compliant materials.
The Edinburgh Professional: James, 45, requires custom whitening trays for home use but wants professional quality without the £400-£500 his dentist quoted. Budget around £150-£200. Best match: ProWhite Direct Teeth Whitening Tray Kit delivers professional-grade custom trays at a fraction of surgery prices, manufactured by specialist dental technicians in the UK.
The Bristol First-Timer: Emma, 32, has never attempted dental impressions and feels anxious about the process. Budget flexible up to £80 for peace of mind. Best match: Caspersmile Dental Impression Kit with its free live video guidance and comprehensive support system that hand-holds nervous beginners through every step.
Understanding Home Impression Kit Accuracy
The question that dominates British buyer forums and Which? discussions is whether DIY dental impressions can truly match the accuracy of professional in-surgery moulds. According to research published in the International Journal of Prosthodontics, silicone impressions can achieve 99.2% accuracy in margin detail reproduction when done correctly, compared to 87% for traditional alginate materials that many NHS surgeries still use. The keyword in that statement is “when done correctly.”
Professional dental practices achieve their consistency through practice, proper equipment, and immediate quality verification. Silicone impressions achieve 99.2% accuracy in margin detail reproduction, but only when users follow protocols meticulously. UK-based dental labs report that approximately 15-20% of home impressions require retakes due to user error—biting too early, removing the tray prematurely, inadequate mixing, or moisture contamination. This isn’t a condemnation of home kits; rather, it highlights the learning curve involved.
What separates successful British users from those who struggle? Three factors emerge consistently: following timing precisely (don’t rush or delay), ensuring a completely dry mouth (saliva is your enemy), and choosing appropriate tray sizes for your mouth anatomy. The best kits—like Venneir and Caspersmile—address these factors through clearer instructions, video support, and quality materials that forgive minor technique variations. Budget kits can produce equally accurate impressions, but they demand more precision from the user with less margin for error.
Temperature plays a larger role in British impressions than manufacturers often acknowledge. Digital scans consistently produce more predictable restorative outcomes in controlled clinical environments, but home users must adapt to varying conditions. A cold Victorian flat in February presents different challenges than a modern centrally-heated apartment in July. Professional-grade putty compensates somewhat through temperature-stable formulations, but British buyers should still aim for that 20-22°C sweet spot when attempting impressions.
Home Impression Kits vs Professional Dental Scans
The British dental landscape has undergone significant technological advancement over the past five years, with many practices now offering digital intraoral scanning as standard. This raises a legitimate question for budget-conscious UK buyers: should you invest £40-£60 in a home impression kit or pay £100-£200 for a professional digital scan at a practice?
Digital impression dental technology is significantly speeding up workflows in UK dental practices by up to 40%, delivering higher precision and eliminating the discomfort of traditional putty materials. Professional scans capture millions of data points per second, creating highly detailed 3D models that laboratories can process immediately without the postal delays inherent to home impression kits. For complex cases involving significant malocclusion, multiple missing teeth, or severe crowding, digital scans often justify their cost through improved treatment outcomes.
However, home impression kits serve a distinct market segment that values convenience and cost savings for relatively straightforward cases. If you’re simply replacing retainers after orthodontic treatment, ordering custom whitening trays, or pursuing minor tooth alignment (2-3mm gaps, slight rotation), the accuracy difference between a well-executed home impression and a professional scan becomes negligible for practical purposes. British buyers with uncomplicated dental anatomy can confidently use quality home kits whilst saving £60-£140 compared to in-surgery scanning.
The hybrid approach gaining popularity across Manchester, Birmingham, and London practices involves offering both options—home kits for simple cases and in-surgery scanning for complex treatments. Some progressive UK dental providers now accept home impressions for initial assessment, then recommend professional scanning only if the case complexity warrants it. This tiered approach maximises value for British patients whilst maintaining appropriate clinical standards.
What to Look for When Buying a Home Impression Kit in the UK
Shopping for dental impression materials on Amazon.co.uk presents British buyers with dozens of options ranging from £15 to £65, making informed selection crucial for avoiding wasted money on substandard kits. Here are the critical factors that actually matter based on consulting with UK dental technicians and reviewing regulatory documentation from the MHRA.
Material Certification and Safety
Verify that the kit displays UKCA marking or states compliance with UK Medical Device Regulations (UK MDR 2002). The MHRA is the UK government agency responsible for ensuring that medical devices meet applicable safety, quality, and efficacy standards. Post-Brexit, legitimate UK-market products must meet these standards regardless of where they’re manufactured. Look for specific statements about BPA-free and latex-free materials if you have sensitivities. Avoid kits with vague “medical grade” claims without specific regulatory certification.
Putty Quality and Working Time
Professional-grade vinyl polysiloxane (VPS) or silicone putty should offer 60-90 seconds working time after mixing and set firmly within 2-4 minutes. Budget kits sometimes use inferior alginate-based materials that set too quickly (under 90 seconds), leaving insufficient time for proper positioning. Check whether the putty is described as “hydrophilic”—this means it repels saliva and maintains accuracy despite moisture, essential for British buyers who produce excess saliva when nervous.
Tray Sizing and Design
Standard kits typically include medium-sized trays suitable for roughly 75% of UK adults. If you have a particularly small or large mouth, verify whether alternative sizes are available or whether the manufacturer offers sizing guidance. The tray should be rigid enough to support the putty without flexing but comfortable enough to fit without causing jaw pain. U-shaped or horseshoe designs accommodate most mouth shapes better than rigid rectangular trays.
Support and Guidance
First-time users benefit enormously from kits offering video tutorials, live support calls, or detailed photographic instructions. The difference between generic text instructions and professional video guidance translates to roughly 30-40% fewer failed impressions based on UK user feedback. Premium kits justify their higher cost partly through this support infrastructure, which proves invaluable if you’re investing £1,500+ in subsequent treatment based on these impressions.
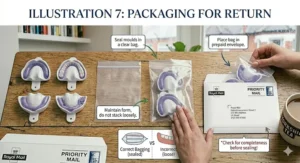
Return Shipping and Guarantees
UK-based kits should include pre-paid return labels or at minimum, clear guidance on posting impressions back to the lab. International kits might require you to arrange and pay for return shipping, potentially adding £10-£20 to your total cost. Check whether the manufacturer offers re-do kits if your first impression fails quality control—the best companies provide free replacement materials rather than making you purchase entirely new kits.
Processing Time and Location
Kits processed by UK-based labs typically deliver finished products within 5-14 working days, whilst international processing can take 3-4 weeks plus potential customs delays. British buyers often underestimate the importance of UK-based manufacturing until they’re waiting 6 weeks for retainers that they need immediately. Verify laboratory location before purchasing, particularly if you have time-sensitive requirements.
Common Mistakes When Using Home Impression Kits
British buyers attempting dental impressions for the first time make predictable errors that compromise accuracy and waste money. Here’s what UK dental technicians report seeing most frequently when they receive substandard impressions from home users, along with practical solutions.
Mistake 1: Inadequate Tooth Drying
Saliva contamination accounts for approximately 30% of failed home impressions according to UK lab data. British users often underestimate how thoroughly they need to dry their teeth before taking impressions. A quick rinse and casual pat with a towel won’t suffice—you need to actively dry every tooth surface, your gums, and your tongue using clean tissue or a dedicated towel. The hydrophilic putty in quality kits resists saliva better than cheap alternatives, but it’s not magical—sufficient moisture still degrades detail capture.
Solution: Before mixing your putty, spend 60 seconds thoroughly drying your mouth. Use tissues to wipe each tooth individually if necessary. Keep your mouth open and breathe through your nose whilst mixing and loading the putty, preventing saliva accumulation. Some British users find that tilting their head forward slightly during upper impressions helps gravity drain saliva away from the tooth surfaces.
Mistake 2: Incorrect Putty Mixing
Incomplete kneading leaves streaks of unmixed base or catalyst, creating soft spots in your impression that distort detail capture. British users working in cold environments often struggle with stiff putty that doesn’t want to mix properly, leading them to give up before achieving uniform colour. Conversely, warm summer conditions can cause putty to set prematurely if mixing takes too long.
Solution: Warm the putty packets in your hands for 30 seconds before opening if you’re working in a cold flat. Knead aggressively and thoroughly, checking for any streaks or swirls. The colour should be completely uniform with no variation. Don’t start loading your tray until you’ve confirmed proper mixing. If the putty feels too stiff, your room is probably too cold—raise the temperature before attempting another impression.
Mistake 3: Insufficient Setting Time
Impatient British buyers often remove the impression tray after 60-90 seconds when they feel the putty firming up, not realising that full polymerisation requires the complete 2-3 minutes specified in instructions. Premature removal distorts the impression as the material hasn’t achieved final hardness, creating inaccuracies that manifest as poorly fitting retainers or aligners weeks later when your custom devices arrive.
Solution: Set a timer for the full recommended duration—typically 2-3 minutes for quality putty. Don’t guess or estimate based on how firm the putty feels. Don’t touch, wiggle, or test the impression during setting. Breathe normally through your nose and wait. Those extra 60 seconds make the difference between an accurate impression and an expensive mistake.
Mistake 4: Excessive Bite Pressure
Many first-timers bite down too hard, thinking more pressure creates better impressions. In reality, excessive force distorts the putty and can even punch through to the tray in spots, creating voids in the impression. British users describe feeling like they need to “chomp” to ensure good contact, but this instinct works against accuracy.
Solution: Close your mouth gently but firmly until you feel consistent resistance across all teeth. Think “firm pressure” not “hard bite.” Your jaw muscles shouldn’t be straining or fatiguing during the 2-3 minute setting period. If holding the position causes jaw pain, you’re pressing too hard. The putty is designed to flow around your teeth with moderate pressure—trust the material.
Mistake 5: Poor Tray Positioning
Off-centre tray placement fails to capture complete impressions of all teeth, particularly the crucial back molars that determine proper fit for retainers and aligners. British users rushing through the process often don’t verify centring before the putty sets, resulting in impressions that show only partial tooth coverage or missing molars entirely.
Solution: Use a mirror to verify tray centring before closing your mouth. Your front teeth should align with the centre of the tray. Check that the putty extends far enough back to capture your last molars. Take an extra 10 seconds to position correctly rather than rushing and wasting £40-£60 on a failed impression. If you’re unsure about positioning, consult the kit’s video tutorial or contact customer support before attempting the impression.
UK Regulations and Safety Considerations
The British regulatory environment for dental impression kits and custom-made dental devices tightened considerably following Brexit and the implementation of updated MHRA requirements in 2024-2026. Understanding these regulations helps UK buyers make informed decisions and avoid potentially unsafe products that don’t meet current standards.
The MHRA is the competent authority for post-market surveillance activity for devices placed on the Northern Ireland market, whilst also overseeing the Great Britain market through the UK Medical Device Regulations. All impression materials and kits sold for dental use must comply with these regulations, which set requirements for device safety, performance, labelling, clinical evaluation, and post-market surveillance.
UKCA Marking Requirements
Post-Brexit, dental impression materials sold in Great Britain (England, Scotland, Wales) must display UKCA marking to demonstrate conformity with UK safety regulations, replacing the previous CE marking system. Northern Ireland continues using CE marking under special arrangements. British buyers should verify that home impression kits display appropriate certification—legitimate products will clearly state compliance with UK MDR 2002 and show UKCA marking on packaging or product listings.
Products lacking proper certification may contain substandard materials that could trigger allergic reactions, fail to capture accurate impressions, or degrade prematurely. The MHRA has enforcement authority to remove non-compliant products from the UK market, but Amazon.co.uk’s international marketplace means some uncertified kits slip through. Stick with kits that explicitly state UKCA compliance and are processed by UK-registered dental laboratories.
Material Safety Standards
High-quality silicone dental impression putty for accurate, reliable impressions made from CE-certified materials is safe, durable, and designed for comfort with no odour or aftertaste. Legitimate kits use medical-grade silicone or vinyl polysiloxane that’s BPA-free, latex-free, and biocompatible for oral use. Avoid products with vague material descriptions or those that don’t specify allergen information—your mouth’s mucous membranes absorb chemicals readily, making material safety non-negotiable.
British buyers with known latex allergies must verify latex-free certification explicitly, as some cheaper impression materials still contain latex despite this being increasingly rare in quality products. Similarly, BPA-free formulations matter for those concerned about endocrine disruption, particularly for materials that will be in direct contact with your oral tissues for 2-3 minutes during impression taking.
Laboratory Compliance
Custom dental devices manufactured from your home impressions must come from MHRA-registered laboratories staffed by GDC (General Dental Council) registered dental technicians. Only General Dental Council registered dental technicians are authorised to sign off custom-made dental devices as fit for the marketplace. This requirement exists because these devices enter your body and must meet rigorous safety standards based on thorough knowledge of manufacturing processes and materials.
When selecting a home impression kit, verify that the associated laboratory is UK-based and MHRA-registered. Kits processed by overseas laboratories may not meet British safety standards, potentially leaving you with ill-fitting or unsafe dental devices. The liability for any adverse reactions rests with the UK practitioner who signs off on the device, which is why reputable British labs refuse to process impressions that don’t meet quality thresholds.
Consumer Rights Protection
British buyers benefit from robust consumer protection under the Consumer Rights Act 2015, which provides stronger safeguards than many international markets. You have the right to products that are as described, fit for purpose, and of satisfactory quality. If your home impression kit arrives damaged, contains incorrect materials, or the resulting dental device doesn’t fit properly despite accurate impressions, you’re entitled to remedies including repair, replacement, or refund.
However, custom-made dental devices created from your own impressions exist in a grey area—whilst you have a 14-day cooling-off period for online purchases under Distance Selling Regulations, this doesn’t automatically apply to bespoke goods made to your specifications. Reputable British companies voluntarily offer satisfaction guarantees and free adjustments, recognising that customer confidence drives their business. Check the specific terms before purchasing, and prioritise companies that explicitly offer re-do provisions if your first impression fails quality control.
FAQ: Home Impression Kits UK
❓ Are home impression kits as accurate as professional dental moulds?
❓ How long do dental impression materials last before I need to post them back?
❓ Can I use home impression kits if I have dental work like crowns or bridges?
❓ What happens if my first impression attempt fails?
❓ Are home dental impression kits legal and safe for use in the UK?
Conclusion: Making Your Home Impression Kit Decision
The British market for home dental impression kits has matured considerably since the early direct-to-consumer days when quality varied wildly and regulatory oversight remained minimal. Today’s UK buyers benefit from stricter MHRA requirements, UKCA marking standards, and robust consumer protections that together ensure the kits available on Amazon.co.uk meet genuine safety and quality thresholds. This doesn’t mean all kits perform equally—far from it—but it does mean the baseline standard has risen substantially over the past three years.
For British buyers weighing whether to invest £40-£60 in a home impression kit versus paying £100-£200 for professional scanning, the decision hinges on case complexity and personal comfort with DIY healthcare. If you’re replacing retainers after orthodontic treatment, ordering custom whitening trays, or pursuing minor alignment corrections, quality home kits deliver accuracy that meets clinical standards whilst saving £100+ compared to in-surgery alternatives. The convenience factor matters too—taking impressions on a Sunday evening in your pyjamas beats scheduling surgery appointments during work hours.
The kits I’ve reviewed here represent the cream of what’s currently available to UK buyers through Amazon.co.uk, each serving slightly different needs and budgets. Venneir excels for buyers prioritising UK-based service and rapid turnaround. Caspersmile suits nervous first-timers who value hand-holding. NewSmile offers the best value for those pursuing complete aligner treatment. Budget-conscious Britons find solid performance in the Dental Impression Mold Kit, whilst ProWhite Direct delivers professional whitening tray quality at consumer prices.
Whichever kit you choose, success ultimately depends on following instructions meticulously, working in appropriate conditions (warm, well-lit room at 20-22°C), and taking your time rather than rushing. Set aside 30-40 minutes when you won’t be interrupted, read the instructions twice before starting, and don’t hesitate to use video support if it’s available. The difference between a £50 investment that delivers perfectly fitting dental devices and a £50 mistake that ends up in your bin comes down to those extra few minutes of preparation and care.
British dental care costs continue rising, making DIY options increasingly attractive for routine maintenance and cosmetic improvements. Home impression kits represent the democratisation of dental customisation—bringing professional-quality moulds within financial and practical reach of ordinary Britons who previously couldn’t justify the £300-£500+ charged by many private practices. That’s genuine progress worth celebrating, provided you choose quality kits from reputable companies and execute the process with the care it deserves.
✨ Recommended for You
- Best Cheap Teeth Whitening UK 2026: 7 Budget Options Under £50
- 7 Best Whitening for Smokers Teeth UK 2026 | Remove Nicotine Stains
- 7 Best Whitening for Coffee Stains UK 2026
Disclaimer: This article contains affiliate links. As an Amazon Associate, I earn from qualifying purchases. If you purchase products through these links, we may earn a small commission at no additional cost to you.
✨ Found this helpful? Share it with your mates! 💬🤗